
Newsletter
March Edition of The Scoop 

Welcome
For ease of reading, printing and sharing full articles, click here to read it in your browser


Garden FOR Life
Soil Blocks: Improving Seed Starting by Linda Geronilla, Ph.D.
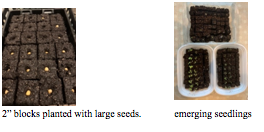
Soil Blocks save time, space, and money in that seeds germinate and grow better. Soil Blocks have a great track record in that they have been used in Europe for over 50 years. The soil block serves as both a container and the nutrition for starting seedlings, thereby eliminating the need for plastic pots. Seedlings grown in soil blocks form stronger root systems than those grown in containers due to increased oxygen to the roots. When seedlings blocks are transplanted into the ground, the plants establish themselves more quickly because of lessened root disruption and are less prone to transplant shock.
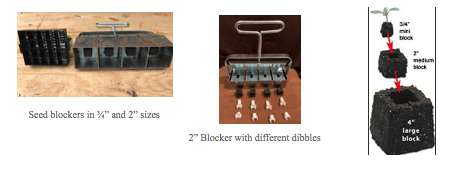 A blocking tool compresses the soil mixture into blocks. Commercially made blockers come in 3 sizes: micro (3/4 “), mini (2”), or large (4”). The micro and mini blocks can be placed in the next size up when the plant needs more space to grow, if it is not ready to be placed in the ground due to soil temperature. Because soil temperatures warm more quickly in spring in SC, the most used blocks are the micro (¾”) for smaller seeds and 2” for larger or fast germinating seeds. Gardeners in colder climates may need to buy the 4”, because they cannot put their transplants in the ground till May. When purchasing the 2” block make sure it comes with 3 different inserts: ½ inch for shallow seeds, 1 inch for deeper seeds, and a 3/4“ cube when it is time to “block up”. Some 2” blockers only come with the ½ inch and not the additional 2 inserts, which most gardeners will use. To save money, some gardeners may decide to make their own blockers. There are several DIY YouTube videos to describe different designs.
The key to good soil blocks is to use a mix containing the correct proportions of compost, peat, coco core, perlite, vermiculite, and nutrient supplements to bind the material together, retain moisture, and provide the right nutrition to the plant depending on the size of the block. Micro blocks only use 1 part compost with 4 parts peat moss, mixed and sifted together with water added to germinate the seeds. As leaves start to form, the formula gets more complex with the larger blocks. Proper soil recipes are easy to find on the internet. Johnny’s Seed sells a mixture called “Johnny’s 512 Mix” that works well in the blocks.
There are many YouTube videos that demonstrate the process of soil blocking such as https://www.johnnyseeds.com/growers-library/tools-supplies/soil-block-maker-instructions.html.
More detailed instructions of Soil Blocks can be found on the Grow Journey website at https://www.growjourney.com/use-ladbrooke-soil-blockers-seed-starting/
To be successful with germinating seeds, it is important to understanding the seed’s ideal soil temperature both minimal and ideal, which can be found at Fedco seeds. They have 3 planting guides (vegetable, herbs, and flowers) that are linked to each other. https://www.fedcoseeds.com/seeds/veggie-chart. For gardeners that would like to extend the season, Johnny’s has several planting guides that can help with succession plantings. Johnny’s has a calculator that gardeners can use by entering: https://www.johnnyseeds.com/growers-library/vegetables/planting-programs.html
Plant propagation
Cuttings - Laurie Churchill
Wandering through my grandmother Mama Jeanne’s yard was always a lesson in plant propagation. No matter what time of year, she would casually cut off a twig with her always available knife (not clippers), scrape on the cut end a little, stick it in the ground and stomp on it because “roots don’t grow in air”. She would do the same with a stem off of a flower, herb or even vegetable. She would use a stick to poke a hole in the soil, put the stem in and stomp on it (carefully). Walking along and there were too many plants in one place? No problem- she would dig up the plants even if it was just the root system, make a hole somewhere else, place the roots/rhizome/tuber in the ground, cover it back up, throw some leaves on top to keep the moisture in and, by now you know what’s coming… stomp on it. You would come back a couple of weeks later and there would be new plants everywhere! She would mail order seeds and fruit trees, but never visited a nursery to buy plants.
For us mere mortals, propagating plants from cuttings might be a little harder, but still within even a beginning gardener’s realm of possibilities! The best “cheat” we have is rooting hormone powder. It’s readily available at the big box stores, nurseries and Amazon. The root hormone works on a variety of cuttings, including new growth, woody stems, leaves and roots. Any cutting dipped in it will have a head start on a vigorous root system to optimize the new plants’ survival. There are many good sites on the internet with the specifics on each kind of cutting, root or leaf. The basics are to use clean clippers or knives on all cuts, make a hole in clean/sterilized potting soil with a stick (also clean), moisten the cut end of whatever you are propagating in water and then dip in the rooting compound, carefully put into the soil without touching the sides of the hole so that the rooting compound isn’t knocked off, fill the hole with soil and push down all around to make sure there are no air pockets. After all of your cuttings are done, water gently and put in a shady warm place. Before dipping the cuttings, the rooting compound should be shaken out of its bottle into another container so that the remaining compound isn’t contaminated in any way. Forsythia, kerria, weigela, camellias, boxwood, roses, succulents, blackberry, trumpet vine, fig, African violets, pathos, rosemary, azaleas, asters, dogwoods, hydrangeas and salvias are all easy to propagate from cuttings. No matter what you choose, look on the internet for specific techniques for that plant.
All that being said, there are still times that I just cut a twig or pull out a root, stick it in the ground and stomp on it….and most of the time it will make a new plant. Thanks, Mama Jeanne
Air Layering - Bonnie Disney
To make a clone or genetic duplicate of shrubs or camellias, layering and air layering are plant propagation techniques that gardeners may use. Although both methods result in creating a clone of the parent plant, knowing which method is more appropriate for a particular situation is important.
In the natural environment, layering is common for many species. Natural layering may occur when a branch touches the ground and produces adventitious roots (roots by chance). For example, you may find a shrub such as a hydrangea spreading because typically these plants may have low limbs that touch the ground. Often the limbs or branches accidentally grow roots without human intervention. To layer by choice rather than by chance, the steps are rather simple. First, select a pliable branch and bend it to touch soil that is loosened to about six inches. Then wound or score the stem by cutting a shallow incision or notch where the branch will touch the soil. The wound will encourage roots to form. Next, pin down the branch with a large staple and/or put a rock or brick to hold the branch in the soil. Next, stake the branch tip near the submerged scored branch. Add soil and mulch to cover the branch and water the layered area regularly. Finally, watch the rooting zone to check on the root development. When the root system has formed, sever the new plant, and transplant the independent plant to a container or garden spot.
So, how do you layer a plant if the limbs do not or should not touch the ground? You air layer! We do not want our camellia Japonicas to have limbs touching the ground because harmful insects and diseases can be transferred to the camellia from the soil; therefore, the technique of air-layering healthy small branches will produce a genetic duplicate.
Here are the steps in the air-layering process according to the American Camellia Society:
- In March or April, select a healthy limb on a camellia and remove a ring of bark 1.5 to 2 times the diameter of the branch. (Make 2 parallel cuts and pull off the bark, eliminating all the green cambium layer.) Make sure this cut is 12-18 inches from the tip of the limb.
- Put hardwood rooting hormone powder on the exposed area.
- Cover the newly cut area with a handful of squeezed, presoaked sphagnum moss. Wrap the moss with plastic and secure with string or twist ties. Cover the entire ball of moss and plastic with aluminum foil that is placed dull side out. (In theory, the dull side will not attract birds who might damage the foil.)
- By late summer or fall, the roots should be visible through the moss. Also, the root ball should feel harder.
- Cut the limb from the parent camellia at the bottom edge of the moss but leave the moss intact with the roots inside. Plant the new camellia with the sphagnum moss surrounding the roots in a container for best results. *
Happy gardening but be aware that some plants are patented and we must respect our patent laws.
Air Layering in the low country - Anna Sheets
Layering is a form of vegetative propagation like rooting and cuttings, except that the new plant remains attached, fed, and protected by the parent plant. There are several methods used in layering.
The first one mimics nature, in that some plants can regenerate by self -layering. They can form adventitious roots from the stems where they touch the soil and form new plants. Plants with runners such as ground ivy (Glechoma hederacea) produce plantlets that then can be lifted from the soil and planted. Some plants which produce long runners of new growth, such as clematis, wisteria, grapes can be self- layered, by wounding the stem between the nodes, pinning the wounded part under the soil, which stimulates root formation and results in new plants.
Tip layering is another form. Some shrubs and climbers, like brambles (Rubus) can root from the tip end of a long stem which is buried in the soil. When a new shoot forms, the rooted tip can be cut from the parent plant producing a new plant.
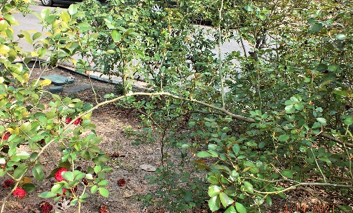 French layering involves pinning a stem from the parent plant that has new shoots forming along the stem to the ground with wire staples. Soil is piled around each shoot, and after several months, roots form and the new plant can be severed from its parent plant. Some roses produce shoots along their stems that this method could be used to acquire new plants.
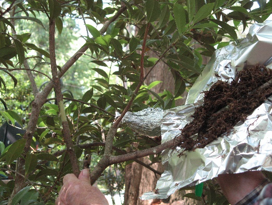 But if your parent plant does not have flexible stems/branches and cannot be bent to the ground, then air layering is a method to reproduce new plants from trees and shrubs. This method should be done in the spring when new growth is starting. In this method, a branch that has been wounded with a shallow cut or had a ring of bark removed which stimulates root production, is surrounded by an aluminum sleeve packed with moistened sphagnum moss which is twisted on to hold it in place around the wounded branch. After several months, the roots develop around the wound, the branch then can be severed from the parent plant below the new roots and planted. These methods produce new plants that are similar if not identical to the parent plant.
Books and websites can teach you the finer details of these propagation methods.
From Seed - Karen Galloway
Seeds
In his book, ‘Taking Root’, Jim Kibler chronicles the writings and thoughts of the Summer brothers, William and Adam, of Pomaria in the 1840s to the 1870s. The Summer brothers owed farms in Newberry and Lexington counties experimenting with plants and seeds while practicing crop diversity and sustainable farming at a time when those methods weren’t considered in the monoculture plantings of the South. Their goal was to yield higher quality plants and renourish the land in the process.
Collection of seeds: Through extensive experimentation the brothers determined the best seeds to collect are the first, fully formed seeds, the plant produces. Do not wait until the end of the growing season, as we typically do, to collect seeds for the next seasons plantings. The first seeds are stronger and more productive than the ones collected at the end of the season. The seeds must be fully dried before storing in a cool, dry place between 32 and 50 degrees.
Breaking the seed dormancy to promote germination: This can be accomplished by two techniques depending on the seed structure.
- 1. Seed Stratification is a means of chilling and warming the seeds to mimic natural conditions that seeds must experience if left outdoors for the winter. To stratify seeds, place them is some moistened peat, sand or paper towels in a closed container or sealed plastic bag. For cold stratification place the container of seeds in the refrigerator. For warm stratification, store them where the temperature remains 68 to 85 degrees Fahrenheit. The length of time depends on the seed structure some outer seed shells are harder than others.
- 2. Seed Scarification is nicking or breaking hard seed coatings like Nasturtium seeds to allow the tiny embryo deep inside the seed to absorb water before planting. Many tools may be used such as sandpaper, a finger nail file or other file, a microplane grater, nail clippers, a sharp knife or razor blade for scarification.
Propagating seeds: There are two planting options to ensure healthy plants depending on growing conditions and types of seeds planted. Research your seeds for the recommended plantings.
Direct-sow: Seeds may be sown directly outdoors into damp, warm, prepared soil. Most seeds germinate best at 64 to 72 degrees Fahrenheit. The direct-sow method
is recommended for certain seeds such carrots and radishes, sweet peas, larkspur, cleome, petunia, marigolds and zinnia.
Indoor Starter Method: The second option is recommended for getting a jump start on the growing season and the best chance of success.
- Read the seed packets for temperature, spacing and depth preferences.
- Start with the right container. Use flats and seed starting trays.
- Place the recommended seed starter mixture in containers and gently tap down. Plant seeds at the instructed depth and cover with soil mixture.
- Maintain temperature recommended and keep soil moist until seeds germinate.
- When first leaves appear, place container under a plant light or in direct sunlight and continue to keep the soil moist.
- Before transplanting outside, harden off your seedlings. Place the plant outside under row cover blankets that gently filter light and hold warm air. Gently brushing the baby plants with the back of your hand a few minutes a day will get the plants used to the wind. Move the plants in and out of the sunlight for short periods of time to get them used to the sunlight.
- Once the container grown seedlings are about 3 inches in height and hardened off, plant them outdoors.
Remember to follow the instructions on the seed packets for a successful flower or vegetable garden and consult with your local extension office for advice.
Bulbs and Corms - Gina Ginther
The definition of a bulb is any plant that stores its complete life cycle in an underground storage structure. The primary function of these underground storage structures is to store nutrient reserves to ensure the plants’ survival during dormant periods when it’s too cold or too hot for them to flower. True bulbs include amaryllis, tulips, daffodils, Dutch iris, lilies and garlic. Bulbs enable many common garden ornamentals to produce their flowers rapidly, almost precociously, in early spring when growing conditions are favorable. Bulbs are usually perennials.
A corm is a short, vertical, swollen stem base that is modified into a mass of storage tissue. A corm is very similar to a bulb, but it stores all of its starchy nutrients in the stem itself. Any leaves that you see are just papery wrappers to protect the stem. Examples of plants that develop from corms include gladiolus, crocus, and autumn crocus and yams. Generally, corms are perennials.
Corms are sometimes confused with bulbs; they are often similar in appearance to bulbs externally, and thus are erroneously called bulbs. Corms are stems that are internally structured with solid tissues, which distinguishes them from bulbs, which are mostly made up of layered fleshy scales that are modified leaves. As a result, a corm cut in half appears solid inside, but a true bulb cut in half reveals that it is made up of layers. Bulbs and corms reproduce by the process of division. Division is a process in which part of the plant is cut or divided into sections, each capable of developing a new plant.
Over the years, your flowering plant’s underground bulb will start to produce new flower bulbs. This generally happens two to seven years after your bulbs first produce flowers. Called offsets, these new bulbs cluster in a circle around the mother bulb. As more and more of these offsets develop, the overcrowding can start to reduce the size of your flowers. As soon as you notice this, it’s time to dig up your flower bulbs and divide them into separate plants. Wait for the fall, when your bulb’s above ground foliage stops growing or begins to wilt. Loosen the soil with a spade being careful not to cut into the bulb. Use your hands to dig the bulbs out and brush the soil off the bulb and roots to clearly see the offsets. Again, using your hands, hold the top of the mother bulb with one hand and the top of the offset bulb with the other, gently peeling it away from the mother bulb in a smooth downward motion. The offset will break off from the mother with a quick snap. Squeeze the mother bulb and if it is not squishy, it’s still probably healthy and should be replanted right away. Plant the offsets in a new place and twice as deep as their height. Don’t plant them as deep as mature bulbs. Small offsets may take a few seasons to reach blooming size. If you are not ready to plant them, they can be stored in a dark, cool, airy place for about a week. Water well when you plant bulbs in the fall for root stimulation. Once bulbs start growing in the spring, water once a week, especially when they are flowering. Water once a week until foliage dies back. Do not water spring-blooming bulbs in the summer when they are dormant.
Corms should be dug up and divided every three to four years to reduce crowding. Do not remove the leaves until they are fully brown. Green leaves produce food energy to be stored in the corm. A true bulb may live indefinitely as a single unit or may increase by splitting itself up, but a mature corm actually withers and dies after one season of growth, renewing itself by producing a new corm, cormels or cormlets that form on top of the old one but sometimes beneath or alongside it. Corms are solid objects, usually quite firm, instead of being formed of layers or scales like a true bulb. Corms are frequently used to propagate a plant by simply digging them out of the ground, then cutting the corms into individual sections and replanting. Each section of the corm that has at least a single bud or root can usually generate a new corm. In summer, allow spring-blooming corms to dry out, but water fall-blooming corms.
Many of us think of spring - a new season or renewal when we see the green tips of the leaves of bulbs, corms, rhizomes and tubers appear, preparing to dance and brighten our gardens with beautiful splashes of color. Many of us feel that after this past year, we too have been waiting to dance and get back to a life of carefree color in life’s garden. This year, may God bless us all with exactly that!
By Division - Kate Copsey
Even the most delightful plants in our gardens, sometimes need to be divided. This can be because you would like to give a friend a cutting from your garden, or it can be that the plant is getting too large for the allotted space. In other cases, particularly with perennials, the center of the plant declines while the active growth continues around the edge. Whatever the reason for you dividing the perennial or bulbs, it is easier to do while they are dormant. This way you are not damaging the upper growth.
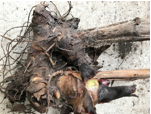
Perennials: Perennials tend to grow out from a central point which can get very woody and dense in mature plants. The roots spread out from this point and, unless you are dividing a large grass, digging up the whole plant is usually the easiest way to start. Using a fork, dig a few inches around the edge of the plant, so as many roots are included as possible. Lift the plant, plus roots, onto the path. Using your fingers, tease the root mass and crown apart to split the plant into 2 or more pieces. Each division should have roots and crown. Replant the original plant and relocate the divisions.
Groundcover perennials are slightly easier to deal with, as the roots spread out as the plant grows laterally. With these plants, it is simply a matter of taking a sharp, preferably square end spade, and dig down into the middle of the plant. Lift the division clear of the mother plant and resettle both the original plant and the division into the area where they are going to grow.
For perennial grasses, particularly pampas type grasses, the root mass can be very dense and hard to divide. A sturdy back and chainsaw may be the only way to divide a mature grass.
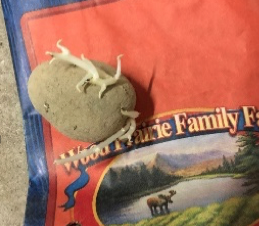 Tubers and Rhizomes: Tubers and rhizomes are very similar, and the groups includes potatoes (tuber) and ginger (rhizome). Potato tubers are familiar to everyone and if kept too long, many grow white roots from the ‘eyes’ on the surface of the tuber.
 Many dahlias also have tubers that are enlarged roots coming from a central point. To divide the tuber, you cut through the tuber or detach the individual sections, such that at least one ‘eye’ or root segment is on each division.
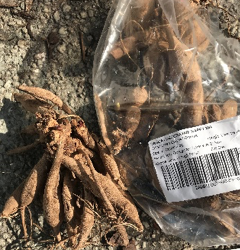
Rhizomes grow laterally and new growth sprouts upward from that. Ginger root is a common rhizome in the kitchen and cannas are also rhizomes and if you look at the ‘root’ of these plants you will see smaller sections that can be snapped off.
 Cannas tend to mass into horizontal segments. Each section becomes a new plant. Some iris are also rhizomes and these are usually divided with some top growth. For plants that already have growth started, trim the top growth to about 6” then lift the whole plant, including rhizome and roots. In an overcrowded rhizome, the sections fall apart easily. Replant the section just under the surface. It is also possible to divide the iris in fall as they go dormant.

Month by Month Gardening
March, the month to Spring into Gardening by Gail Watkins Ford, East Sandhills District
PLANT:
- Seeds for tomatoes, eggplant, peppers and herbs, etc. inside or protected area.
- Vegetable seeds in the ground after last frost, usually around April 15.
- Amaryllis in the ground left over from Christmas forcing indoors
- Cool weather vegetables in the garden.
FERTILIZE:
- Roses according to American Rose Society guidelines. Look for a formula that includes primary, secondary, macro and micro-nutrients.
- Shrubs and evergreens. A suggested formula includes a mixture: ½ bag 10-10-10, 1 bag cow manure, 1/3 bag of ironite and a 5 pound Epson salt.* Mix and broadcast 1 to 5 gallons per shrub and water well.
- All flower beds with 5-10-10.
- Remove top 1/3 of the soil in container pots. Replace with this suggested mixture: 1 bag commercial potting soil, 1 bag cow manure, 1 bag Bloomin’ EZ (available at some Ace Hardware stores) and 1/3 bag of vermiculite.* Your containers will be ready for summer flowers. Top container with pine bark mulch.
- Boxwoods with Cotton seed meal or superphosphate.
- Spring bulbs with bone meal after they bloom and again in the fall.
PRUNE:
- Geraniums, allow cutting to dry over night and root.
- Border and ornamental grasses.
- Old leaves from Hellebore (Lenten Rose). Do not mulch hellebores. They will drop seeds and provide new plants.
- Dormant shrubs.
- Spring flowering shrubs until after they bloom.
Routine Care:
- Divide and share perennials.
- Pick up spent camellia blooms to prevent disease. Do not compost spent blooms.
- Trim lower branches of camellias near the ground to prevent disease.
- Wait until the temperature is consistently above 50 degrees before cleaning flower beds. Bees, butterflies and pollinators overwinter in dead leaves and hollow flower stems.
- Cut spring blooming branches and enjoy them in vases in your home.
Sources:
- *Dr. Grady Locklear (Gardner Extraordinaire) of Sumter, SC. You may follow Dr. Locklear on Facebook and see pictures of his famous garden and his gardening suggestions. PS, with his formula one of his camellias has 700 blooms this year!
West Low country - by Anna Sheets
- Prune and shape deciduous trees and shrubs
- Prune roses and fertilize.
- Prune camellias after blooming has ended-pick up spent blooms- throw in trash
- Plant cool season flowers- geraniums, dianthus, alyssum
- Plan your vegetable garden.
East Low Country by Kate Copsey
Rain, frosts and great mild garden days are the March scene – and so much to do in the garden as spring begins:
1: Start your tomato seeds: There are numerous varieties of tomatoes available in seed compared to those in the store. There is still time to order a few varieties and start the seeds. Give them good light and a heat mat if you have one to hasten germination. Other warm weather vegetables like eggplant, basil and peppers can all be started now, indoors.
2: Get some education: On those wet or cold March days, take the time to find some of the many YouTube videos about gardening but also some virtual classes and events. The pandemic has forced many organizations to offer their conferences and classes online which you can attend for a small fee. Great, respected speakers are now as close as your computer.
3: Plan the summer containers: Before long the heat of summer will return and pansies will be past their best. Fill your summer container plants with some heat loving marigolds, calenda for your summer containers.
4: Watering: Each summer we get periods of dry weather and annual beds as well as vegetable gardens will require extra water. Plan your gardens well and make sure the irrigation lines are working so that you are not surprised by them failing.
5: Mulch: Yes, it is almost spring and trucks full of mulch are travelling to gardens across the area. Weed the garden well, then mulch to keep the weeds at bay.

Pollinator of the Month
The Painted Lady butterfly is a common site in the early spring pollinator gardens of South Carolina as many emerge in early March in preparation for a very long journey.
One of the most common butterflies, it can be found on every continent except Antarctica and Australia.
Host plants include asters and mallows, but their absolute favorite host plant is thistle. As caterpillars, Painted Ladies create a silky tent around the head of the thistle flower, pupating within weeks, to emerge and begin their migrations north.
Unlike most butterflies, scientists are unclear what triggers their unpredictable migrations in spring and fall, and many theorize that El Nino weather patterns may guide their pathway. Like many butterflies, Painted Ladies cover a lot of ground and can fly 100 miles in a single day, with speeds of up to 30 miles per hour.
Attracting these butterflies to your garden is easy with thistle and asters as host plants and compound flowers like viburnum, sunflowers, and lantana as nectar sources.
Pollinator Habitat Gardening
 March sweeps across South Carolina's pollinator gardens with full force, as spring ephemerals provide a glorious show at the beginning of the month in the low country, and make a giant wave all the way through our state over the course of the next two months.
In the pollinator garden, these include early spring 'weeds' like henbit and florida betony, as well as native beauties like the Carolina geranium, also called Carolina Cranesbill, after its unique seed heads. Each of these have tiny, almost inconspicuous flowers that feed native bees as they are just emerging from their winter hibernation underground.
While many turf gardeners use March to spray these weeds, smart, GardenFORlife gardeners know their value and let them bloom as needed to support the emerging pollinators.
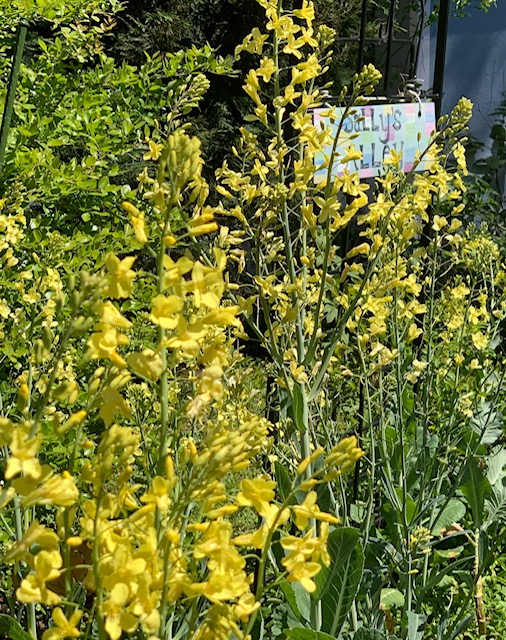
Another good practice is to allow your winter vegetables to go to flower. If you've ever travelled the back roads of our beautiful state in early spring, the roadsides are filled with giant yellow flower stalks of wild mustard, collards, and lettuce blooms from seeds that escaped from old farmland. In the home garden, these same blooms become a critical source of nectar for bees, wasps, and early spring butterflies, as well as a source of nectar for earl beneficial insects like flower beetles and ladybugs.